Welcome to the Philips Automated Espresso Machine Series, where making great coffee is easy and quick. These machines are perfect for coffee lovers who want cafe-quality drinks with just the press of a button. Whether you like a strong espresso ,drip filter coffee, or a smooth cappuccino, these machines deliver the perfect cup every time. With simple controls, customizable options, and advanced technology, Philips makes your daily filter coffee routine a breeze.
The Philips coffee machines are designed in such a way that the art of making coffee is transformed into a simple, everyday pleasure. Crafting the perfect cup of coffee requires the right balance of flavor, aroma, and texture. With Philips, this artistry is at your fingertips. Each machine is designed to bring out the best in every coffee bean, delivering rich, aromatic espresso or silky smooth cappuccino with ease. The precision engineering and intuitive controls ensure that every cup is a masterpiece, turning your coffee-making routine into a delightful experience. Join us as we explore how the Philips Automated Espresso Machine enlights the love of coffee in you!
Specifications
| Cord length | 100 cm |
| voltage | 230 V |
| Frequency | 50 Hz |
| Milk Carafe capacity | 0.26 L |
| Water tank capacity | 1.8 L |
| Coffee bean capacity | 275 g |
| weight | 8 kg |
| color | Black, matte black |
| Dimensions | 246 x 371 x 433 mm |
| Brewing power consumption | 1500 W |
Accessories included with Philips coffee machine
- Measuring scoop
- Water hardness test strip
- AquaClean filter
- Grease tube
- LatteGo storage lid
Modes in the machine
- Aroma strength settings – 3
- Grinder settings – 12
- coffee and milk length – Adjustable
- pre-brew aroma control – yes
- temperature settings – 3
- Beverages – 4 ( Espresso, cappuccino, coffee, hot water)
Unique features of Philips espresso maker
Cyclonic frothing technology
Enjoy silky-smooth cappuccinos not only with milk, but also when using your favorite plant-based milks(almond, soy milk, etc.). Thanks to the cyclonic frothing technology, Latte Go can froth various types of milk, transforming them into a creamy and smooth texture perfect for your cappuccinos.
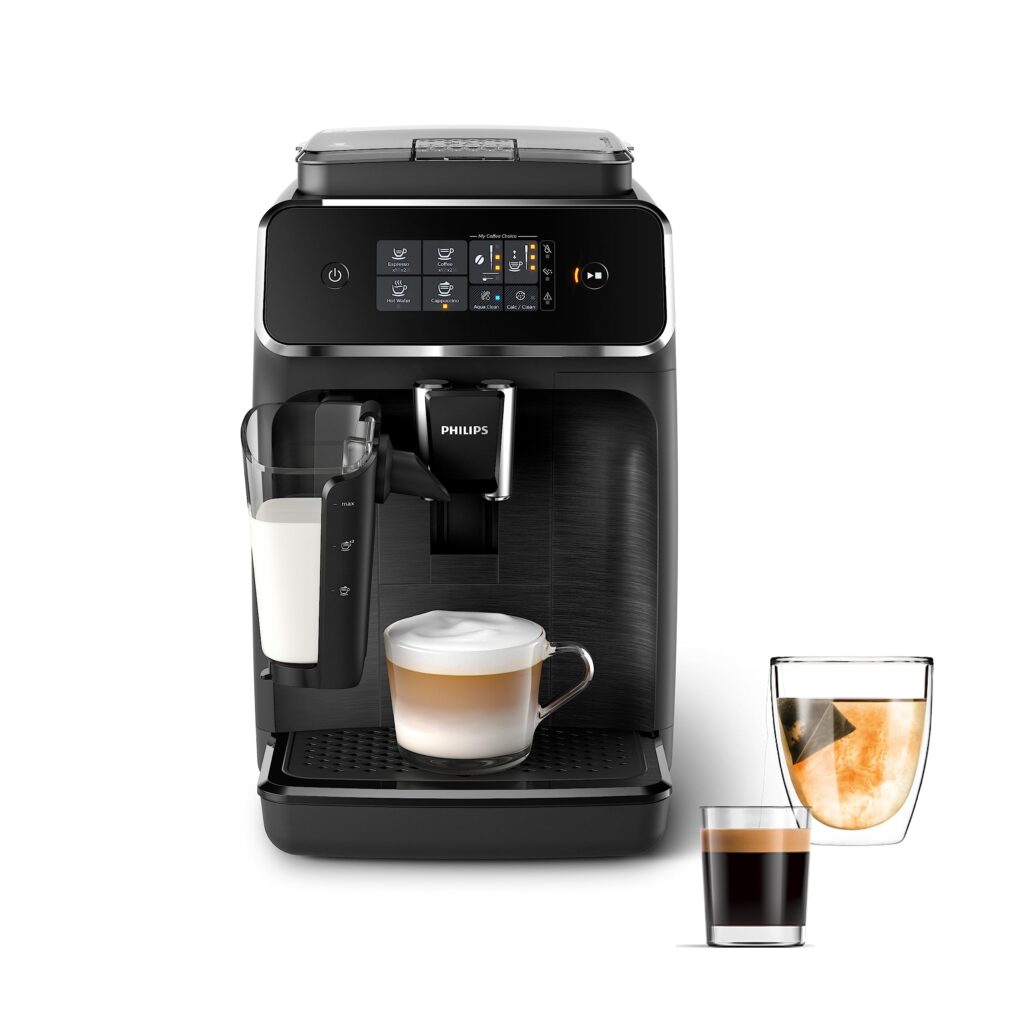
Latte go
Latte Go system allows you to enjoy frothy milk without a steam frothe. The two-part milk system doesn’t have any tubes or hidden parts, making it easy to clean. You can wash it under the tap in just 15 seconds or put it in the dishwasher.
Ceramic grinder
The ceramic grinder grinds fresh coffee beans for a hot coffee brew. You can adjust the grinder settings from coarse to fine using a knob on top. There’s also a compartment for pre-ground coffee, so you can enjoy your favorite coffee.
Aqua clean filter
This filter keeps the water in the tank clean, which means you don’t need to descale the machine as often.
Aroma extract
The new Aroma seal keeps your coffee beans fresh and preserves their original aroma, while also making the grinder quieter. The Aroma Extract system smartly balances the brewing temperature and aroma extraction by keeping the water between 90 and 98°C and controlling the water flow. This ensures you can enjoy delicious coffee every time.
customisable coffee options
Use the ‘My Coffee Choice’ menu to adjust the strength and amount of your drink. You can easily pick from three different settings to match your taste.
| Pros Aroma seal technology Aqua clean filter available Can Customize your drinks | Cons Only Drip tray and latte go are dishwasher safe Need to brew 2 or 3 cups of coffee before you can see the difference in grind |
First Installation
Slide the water tank out of the machine. Fill the water tank to the max line and slide it back into the machine. Open the lid on top of the bean container, add fresh coffee beans, and close the lid. Place a bowl under the coffee and water spouts. Turn on the machine. The ‘drink’ lights will light up in a row, showing the machine is heating up. The machine will then rinse water through the water spout. This process is noisy as the machine pulls water through the system.
Activation of aqua clean filter
When you use the machine for the first time, the Aqua Clean light will flash orange, indicating that you can start using the Aqua Clean filter. First, unwrap the Aqua Clean filter and shake it for five seconds. Then, hold the filter upside down in a jug of cold water until no air bubbles come out. Slide out the water tank and empty it. Insert the Aqua Clean filter vertically and press it firmly to fix it in place. Refill the tank with water and slide it back into the machine. Place a bowl under the coffee spout. Press the Aqua Clean icon for three seconds until the play/pause button starts to pulse. Then, press the play/pause button to activate the process. Hot water will be dispensed from the spout, which may take a few minutes. The Aqua Clean light will turn blue, indicating that the filter has been activated correctly.
Setting the water hardness
Setting the correct water hardness prevents you from de-scaling the machine too often. To do this, immerse the water hardness strip in tap water or hold it under the tap for 1 second. After 1 minute, check the number of red squares on the strip, which shows the water hardness.
Next, switch off the machine and tap and hold the aroma strength icon until all the lights turn on. Tap the aroma strength icon 1, 2, 3, or 4 times to match the number of lights with the red squares on the strip. Then, press the play/pause button to confirm the setting. Finally, press the on/off button to start the machine.
Assembling the latte go
Remove the transport sticker from the beaker and the frame then take off the tape and sticker. Rinse the Latte Go before using it. To assemble the Latte Go, insert the top of the milk container under the frame. Press the container until you hear a click to lock it in place. Then, click the Latte Go onto the machine.
Brewing espresso
To brew one cup,Place an espresso cup under the nozzle. Pull the coffee spout down. Tap the espresso icon, then tap the play/pause button. The machine will start brewing your espresso.
To brew two cups, Place two espresso cups under the nozzle and pull the coffee spout down so that each spout directs into a cup. Tap the espresso icon twice, and the ‘2x’ light will turn on. Then tap the play/pause button, and your espressos will be brewed.
Brewing coffee
Place a large coffee cup under the coffee spout. Tap the coffee icon and press play/pause button and your coffee is done
Making cappuccino
Make sure Latte Go is attached to the machine. Pour cold milk into Latte Go until it reaches the cappuccino indicator. Place a cup under the milk and coffee spouts. Tap the cappuccino button, then press the play/pause button. First, the milk will be dispensed, followed by the coffee. Clean the Latte Go parts under the tap after finished making coffee.
Dispensing hot water
Remove the Latte Go and place a cup under the water spout. Tap the hot water icon, then press the play/pause button to dispense hot water.
Brewing pre-ground coffee
Place a cup under the water spout. Open the lid of the pre-ground coffee compartment and pour in one measuring spoon of pre-ground coffee. Select the drink you want to brew. Press the aroma strength icon for 3 seconds until the pre-ground coffee light turns on and the play/pause button starts pulsing. Press the play/pause button to start brewing your coffee.
Personalising drinks
To brew your desired drink, tap the icon corresponding to it. When you do, the aroma strength and quality lights will illuminate. You can adjust the quantity by tapping the drink quality icon for low, medium, or high. The machine will remember your settings for future brews. If you want to permanently adjust the default quality for coffee and milk drinks, you can only adjust the highest default quantity setting for coffee. To do this, press and hold the icon of the drink you want to adjust for 3 seconds. The upper light of the quantity icon and the play/pause button will start pulsing, indicating you’re in programming mode. Press the play/pause button to start brewing the selected beverage. For milk-based beverages, milk is dispensed first.
When the machine is ready to adjust the volume, the play/pause button will pulse. Press it again when the cup contains the desired coffee quantity. The machine will automatically start dispensing coffee. Repeat this step if needed until the cup contains the desired amount of coffee.
Adjust the grinder settings
To adjust the grind, use the knob setting inside the coffee beans container. Place a cup under the coffee spout and open the lid of the bean hopper. Tap the espresso icon and press the play/pause button. When the grinder starts grinding, press down the knob and turn the dot to your desired preference. A larger dot means a coarser grind, while a smaller dot means a finer grind. Be careful not to turn the knob more than once at a time to avoid damaging the grinder.
You may need to brew 2-3 cups before you can taste the full difference in the grind. With these adjustments, make coffees easier than ever. Enjoy Your Fresh Brewed Coffee Everyday!


Leave a Reply